Alright, so you’re ready to start a blog. Congratulations! Well, I know when I started I was pretty intimidated by the whole process and I’m a computer science major!

Well, with all the info out there and different companies to purchase your domain and hosting services through, as well as being sure you having the right resources, etc. it sure can be intimidating.
I’ve taken my experience in getting a few sites set up and put it into an easy to follow step-by-step guide on how to start a blog.
Ok, first things first, an explanation on what this guide will provide as well as what you can expect to have once you’ve gone through it.
This guide will walk you through getting your domain name and hosting service through Bluehost. Yes, there are tons of options when it comes to this, but in my experience, Bluehost is the easiest and most friendly to beginner users. At the time this article was written, both of our websites (crazyfamilyadventure.com and virtualpowerhouse.com) were hosted with Bluehost. Bluehost is a good entry-level provider and a good choice for just starting out.
The other thing this guide will do is show you how to get WordPress set up on your site so you can get your blogging on. WordPress is an easy to use content management system. That’s a fancy way of saying the back-end of your website. I’ll show you how to get WordPress installed so you’ll be ready to publish your first blog post. Exciting stuff!
Table of Contents
Ok, let’s start a blog!
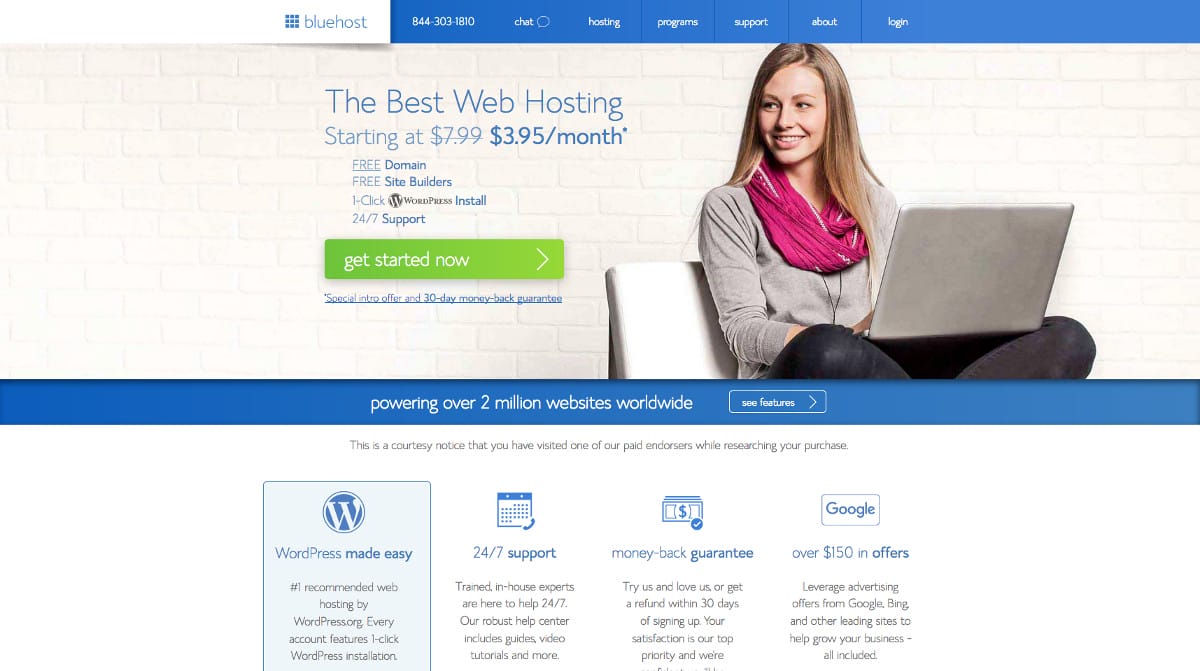
1. The first step to start a blog is to go out to the Bluehost’s website to get the process rolling. Here’s the link to Bluehost.
2. Once there, click the “get started now” button. This is like taking the red pill, Neo.
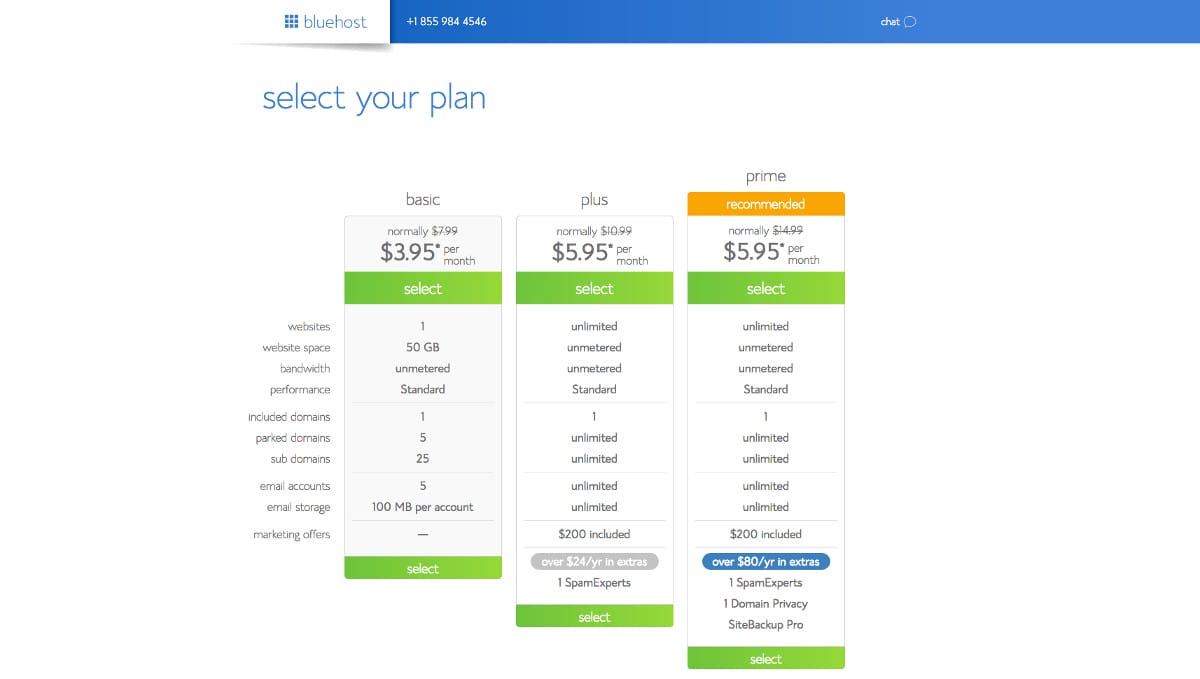
3. The next step in how to start a blog is to choose what plan you want. If you’re reading this guide, I’m guessing this may be your first website and you’re just starting out. My recommendation would be to select at least the “plus” plan. With this plan, you get more space, bandwidth and just about everything else while still just costing a few bucks a month. Every once in a while the prime plan is the same price as plus, so if that’s the case, go with prime.
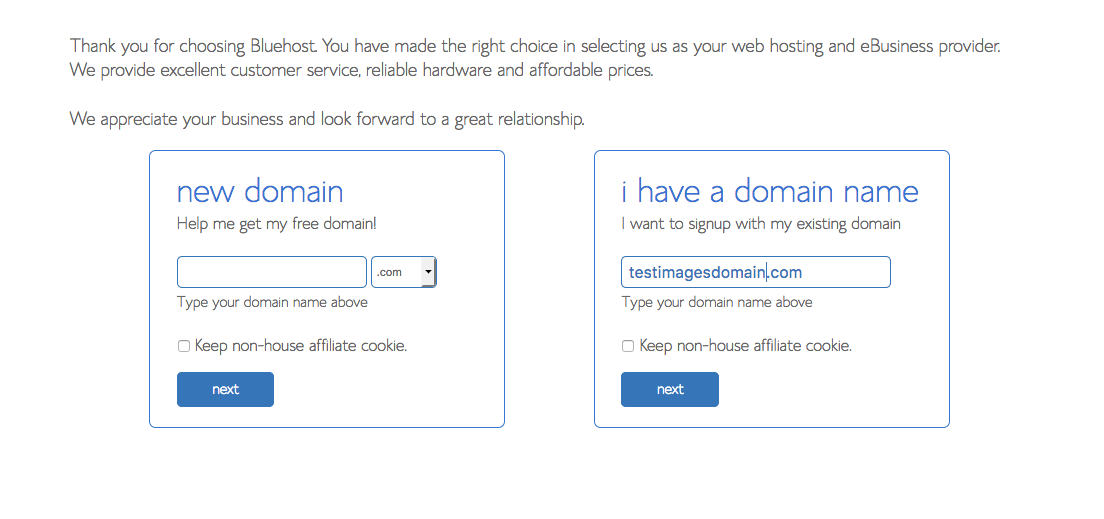
4. After selecting your plan, you’ll have to select your domain name. Your domain name is the URL to your website. You may even own a domain name already where you’ll veer a bit from this guide to enter those credentials. If you do not have a domain name yet, type the name you’d like in the box along with selecting the domain extension (.com = good).
This may be the easiest step or the hardest when you start a blog depending on if you have something picked out that is available. I say “available” because there is a chance the domain name you have your heart set on is already owned by someone else. If that’s the case, Bluehost will tell you and, sadly, you’ll have to choose another.
My advice for this step is to pick either your business name or something close to your business name without making it too long. You want short and sweet, and most of all, memorable.
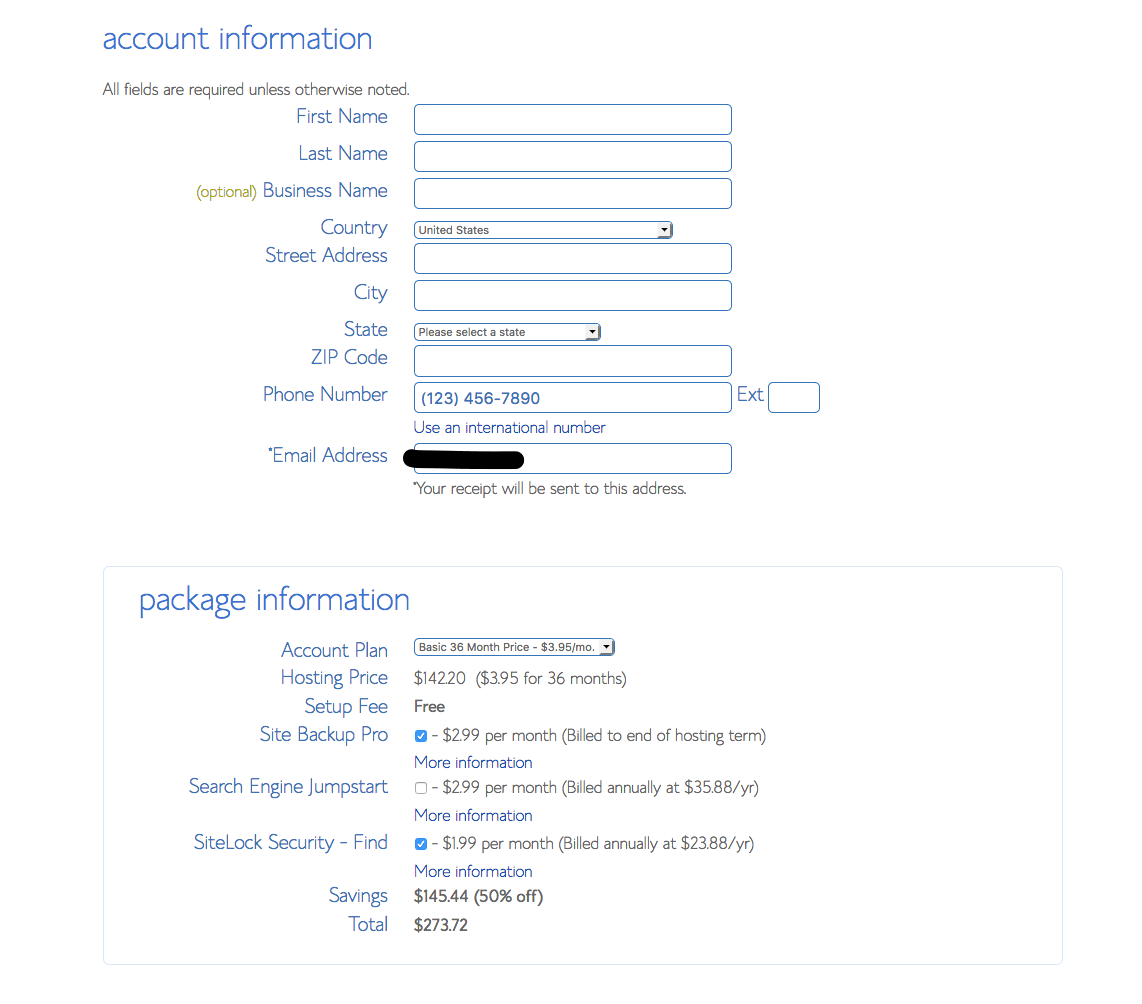
5. Now that you have your domain secured, it’s time to fill in all your details and pony up some cash. If you’re actually setting up your blog right now while reading this, I’ll go over each section of the page you are seeing one by one just because there is quite a bit going on here. If you’re not setting up your blog just yet, take a peek at the picture down below to see what we’re talking about here.
First is your account information. Easy enough. The only thing to note here is that the email address you enter is the one your initial password will be sent, so be sure you have access to that email account.
The next section is the package you want to purchase. Here you’ll be able to say how long you want to be hosted for in the Account Plan drop down box. You’ll see that the longer you sign up for, the cheaper it gets. I’m all for saving a few bucks, but keep in mind that you have to pay for that entire cost up front, so if you choose 36 months at $5.95/mo, you’ll have to pay $214.20 today. Also, if you do that and maybe a year from now you want to cancel it because you hit the big time and are moving to a top notch hosting provider, you don’t get a refund.
Here is my take on the rest of the checkboxes.
Constant Contact – Don’t check it. This is Bluehost’s email marketing service provider. As a side note, capturing your audience’s email addresses is total gold. You then have a direct line to them anytime you want to send out new content or offer anything for sale. So while capturing your reader’s emails is great, I suggest leaving that up to a company where that is all they do. We currently use AWeber. They are easy to use, affordable, and offer great products and features.
Domain Privacy Protection – Check it. For $1 a month, your personal information won’t be shared by Bluehost to the ICANN database. Here’s a short video that explains it better than I can https://www.bluehost.com/blog/our-products/domain-privacy-protect-your-personal-information-1177, but the short of it is, pay the $1.
Site Backup Pro – Don’t check it. This basically backs up your website and while I am totally for backing up your website (read: BACK UP YOUR WEBSITE!!!), you don’t have to pay Bluehost to do it. There are tons of free WordPress plugins that can do that for you. Also, if you think about it, if the hosting service backs up your stuff and they get hit with an attack or have hardware problems, how safe do you think your backups will be? I have my backups stored elsewhere.
Search Engine Jumpstart – Don’t check it. This sounds awesome, right? You are jumpstarting your presence on Google. How could you go wrong?? Well, it sounds too good to be true to me. We’ve been doing this for a while and for Google to notice you, you just need to be persistent in the content you put out and make it good. I say skip this one.
SiteLock Security – Don’t check it. This is a small security suite provided by Bluehost. It will do security scans of your website as well as some spam monitoring. Again, there are plenty of plugins that can help with security that are free or cost a bit and very good. I say pass on this one.
Ok, so the middle section should only have Domain Privacy Protection checked.
The next section is how you’re going to pay for all this. Enter your credit card info here.
Make sure the confirm box is check, then click “submit”.
6. That was a long step, sheesh! Let’s make the next one short. Just click “no thanks” to Bluehost’s other offers if asked.
7. Ok, the deal is done! You are the proud owner of a fancy new website, congratulations! You are well on your way to start a blog.
You’ll see a summary of all the details you just entered in the past 6 steps. The next thing to do to start a blog is to get your login set up. To do this, click “create your password”.
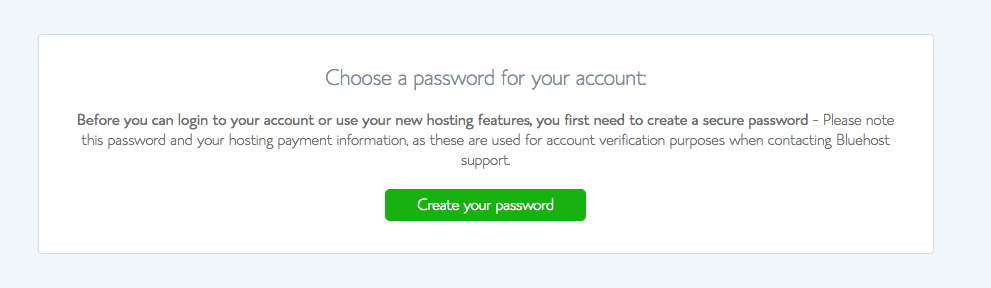
8. Bluehost will send you an email with your login information. This will go to the email address you entered earlier. Go out to your email and find it. It will look like this.
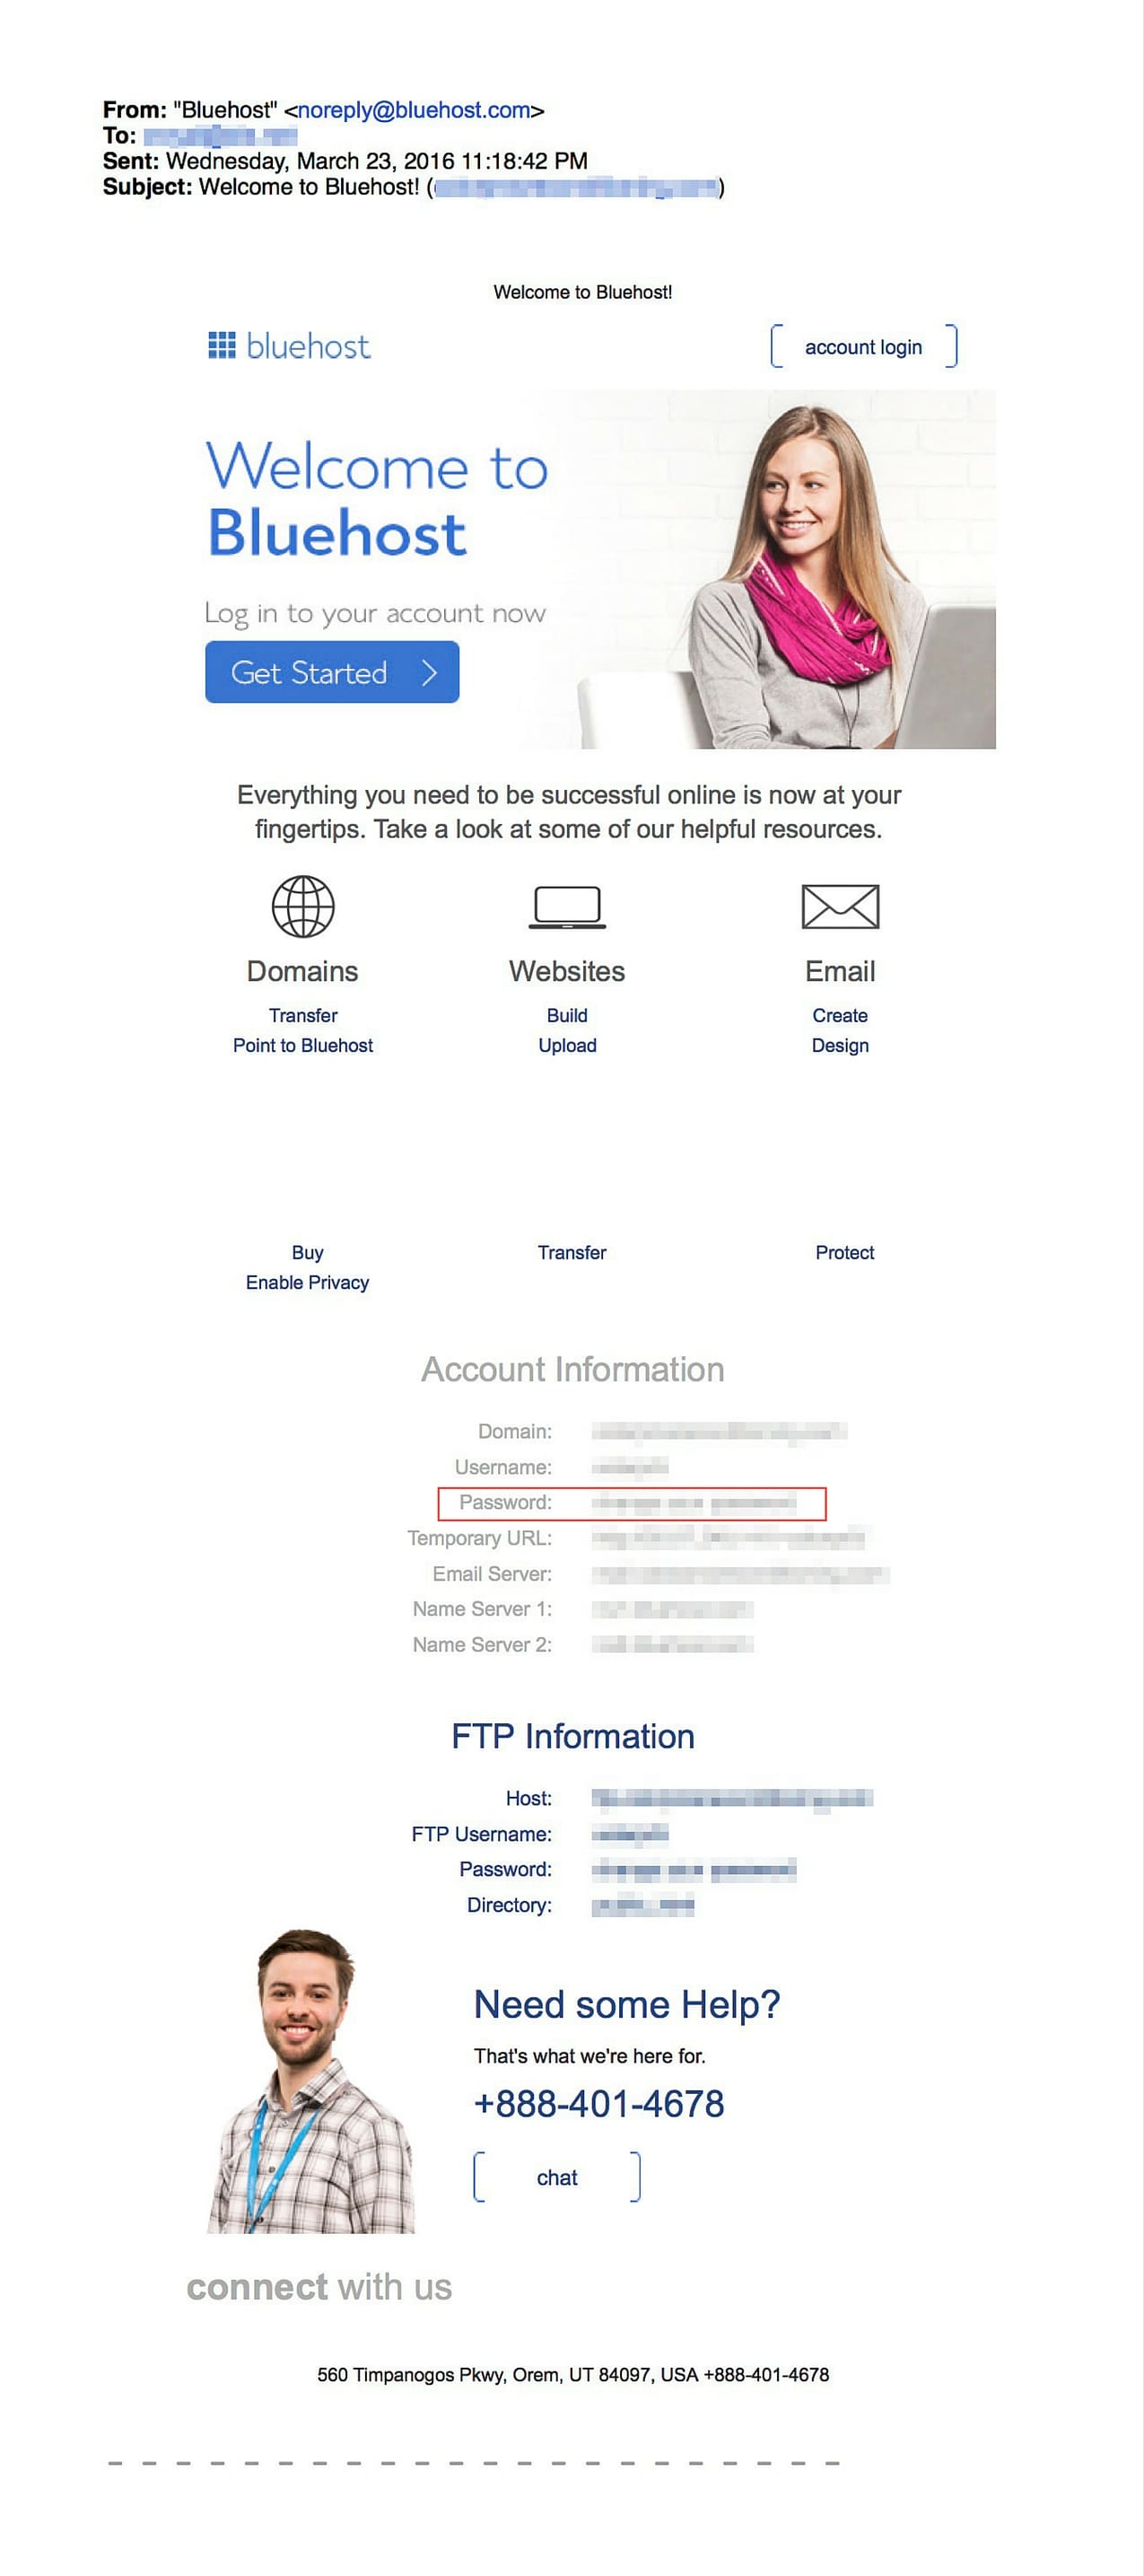
9. In the email, next to the Password field, it has a link saying “change your password”. Click that to get your password set up.
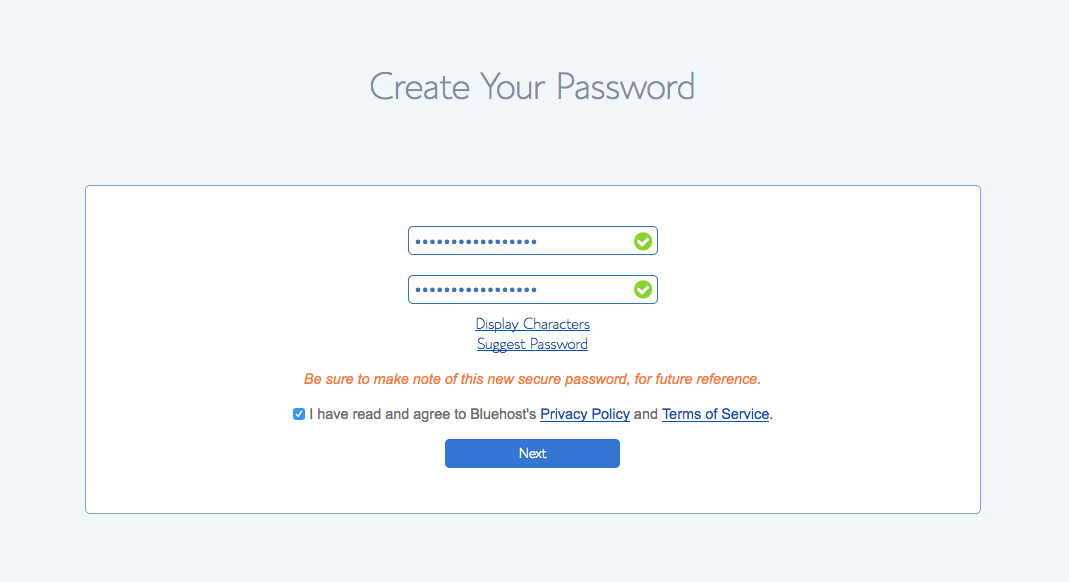
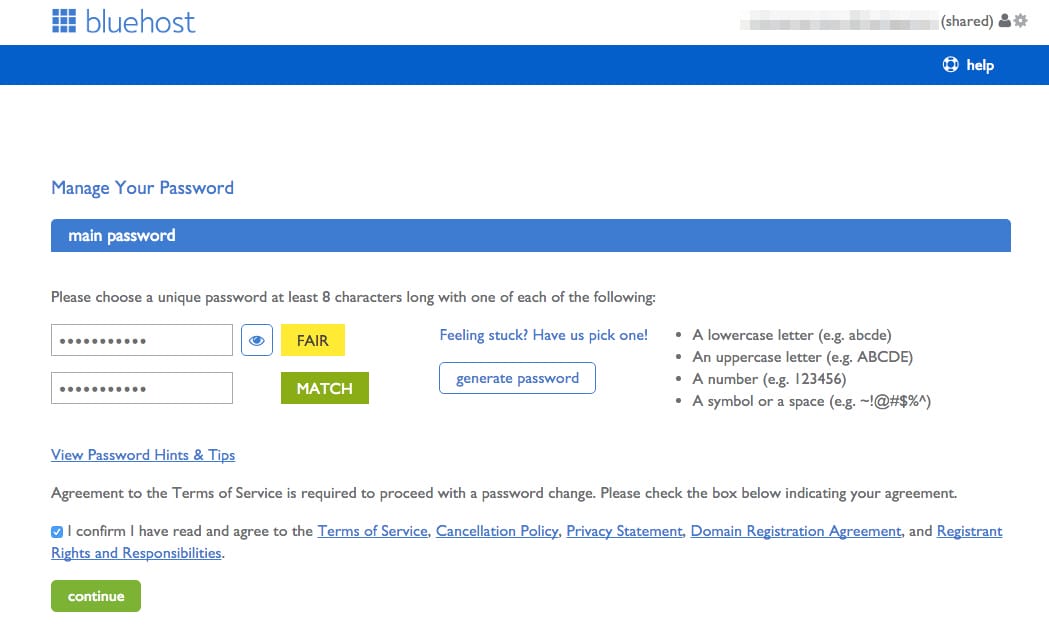
You’ll be taken to a screen where you will create your password. You’ll have to meet some criteria to be sure the password is strong enough. Type it in again to be sure you got it right, check the confirm box and click “continue”.
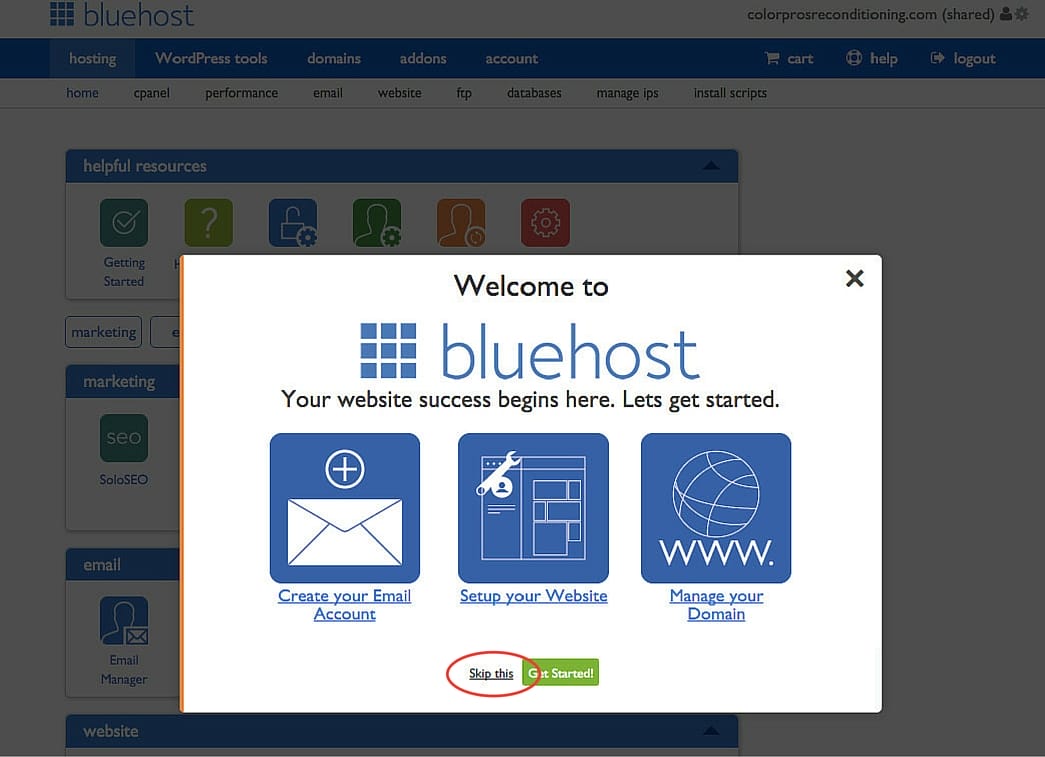
10. Ok! You’re in! Welcome to Bluehost’s CPanel (short for control panel. Those tricky buggers). Once you get there, you’ll see a welcome window pop up giving you 3 options: Create your Email Account, Setup your Website and Manage your Domain.
This pops up every. single. time. you log in, so just click “Skip this”.
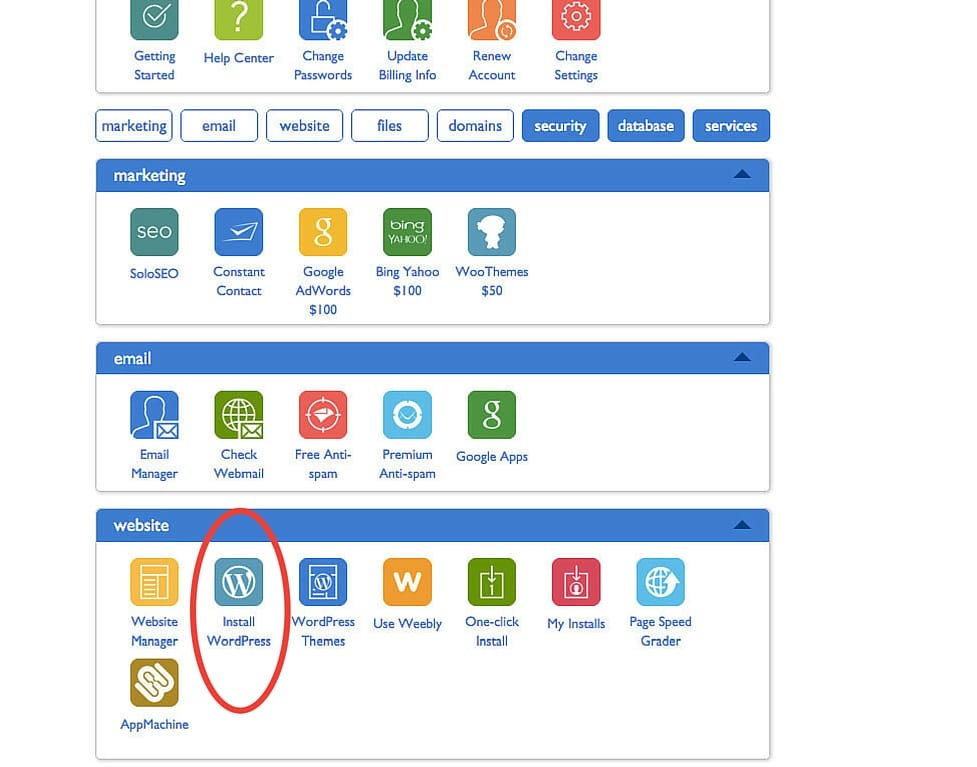
11. Now you’re really in. This is CPanel. This is where your entire website can be managed from. As you can see, there are a TON of buttons. Let’s avoid confusion and not look at them all right now. Just look for the one that says Install WordPress which is under the website section. Then click it!
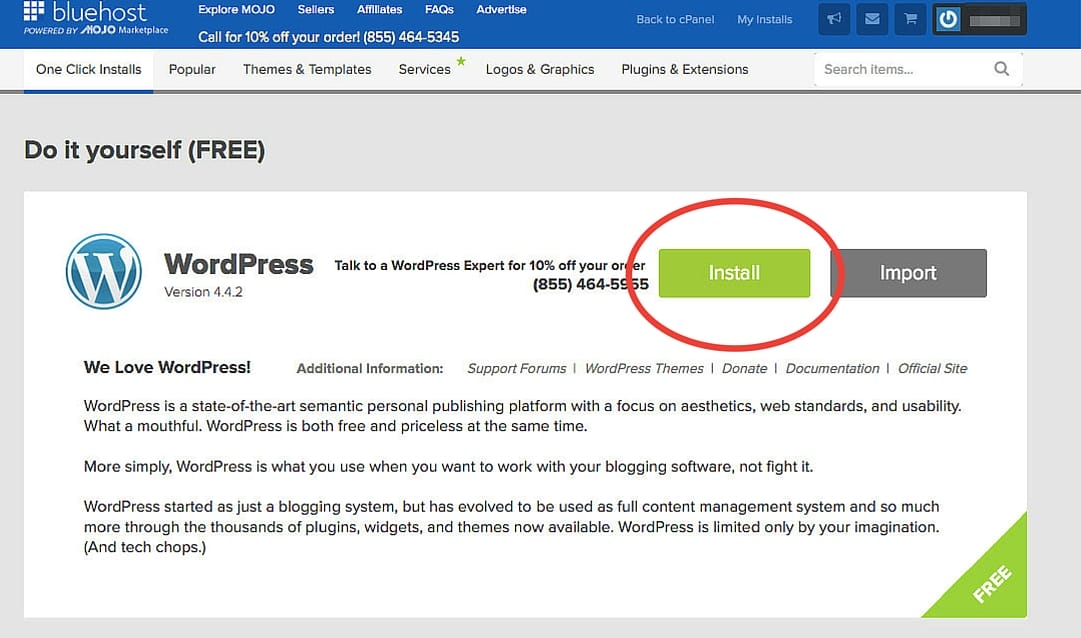
12. You’ll get bumped to a page that gives you 2 options. “Do it yourself (FREE)” or “Let us dot it for you (Paid)”.
Click “Install” under the DIY section. I got you.
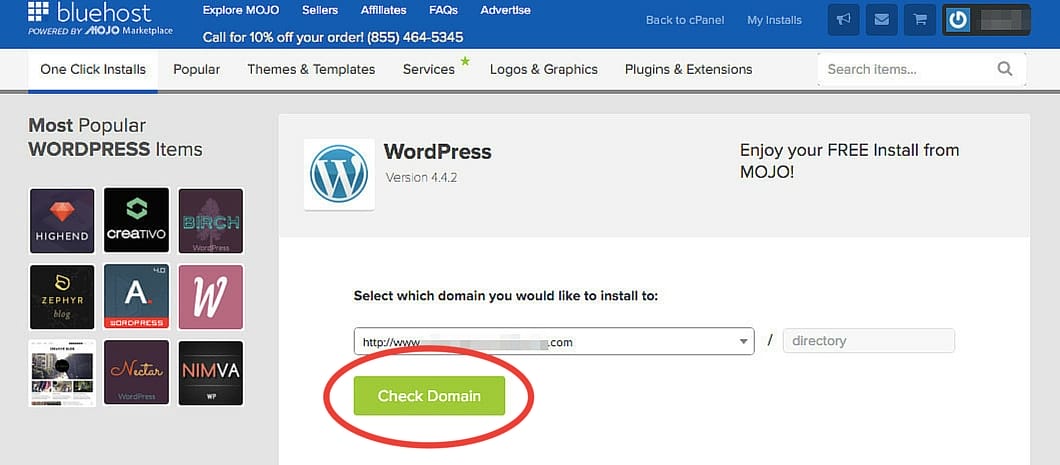
13. Next step to start a blog, you’ll see a drop-down box with your domain in it. If you happen to have several domains, you can click the drop-down and pick the right one. Once you have the correct domain in the box, click “Check Domain”.
14. You’ll get a spinning circle saying that your domain is being checked.
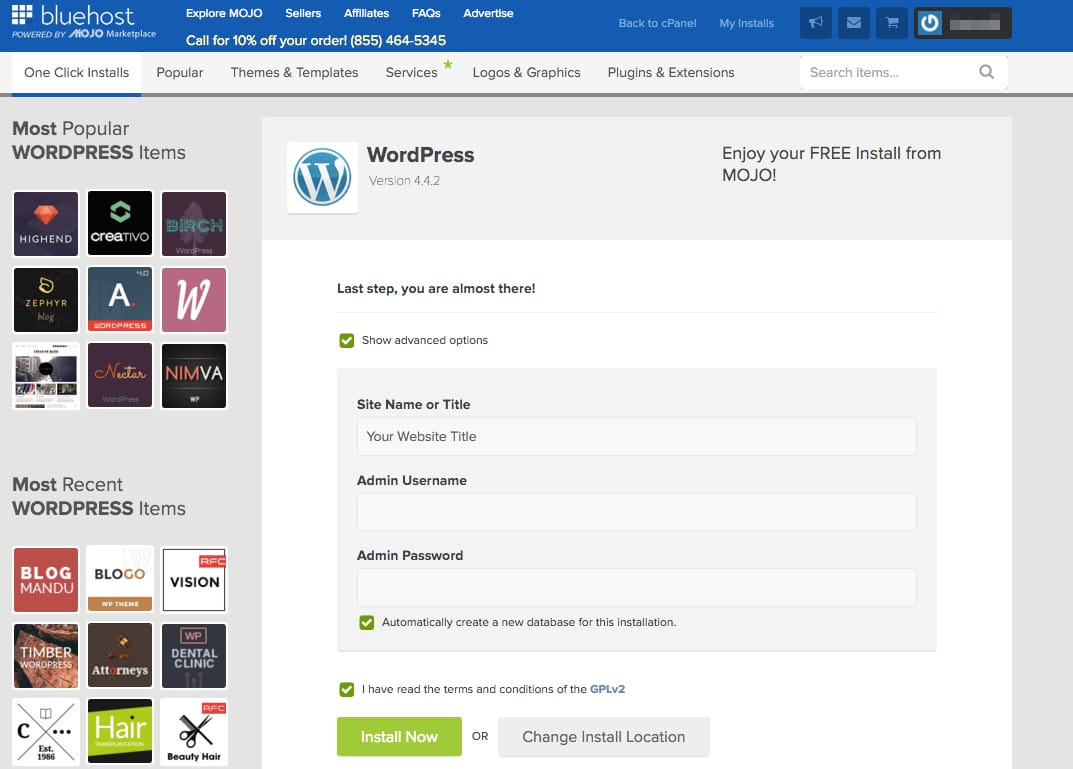
Then you’ll get to the last step. Check “Show advanced options”. You’ll be managing this site, right? Might as well bring on the advanced options! Well, they’re actually not that advanced. Key in your site title, as well as a username that will be an admin on the site. Pick something cool like Webmaster or Galdalf or something. Then type in an even cooler password. Like one that no one would guess. Ever.
Also check that you have read the terms even though I know you haven’t. Boooooooring….
Click “Install Now”.
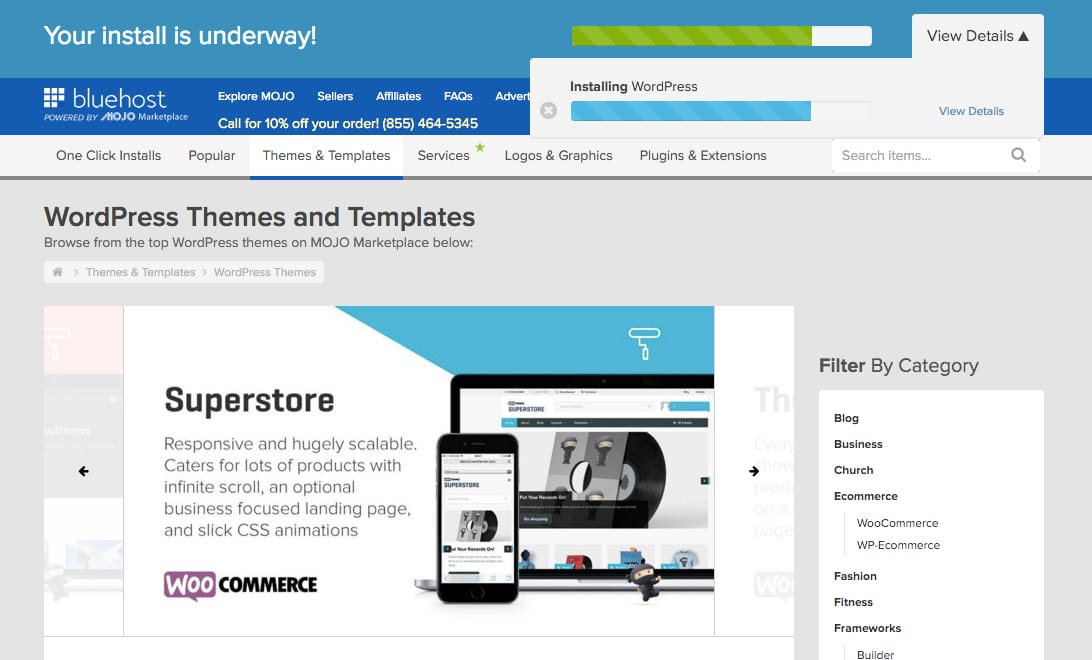
15. The install goes fairly quickly. You’ll see a progress bar up top, but it should finish in a minute .
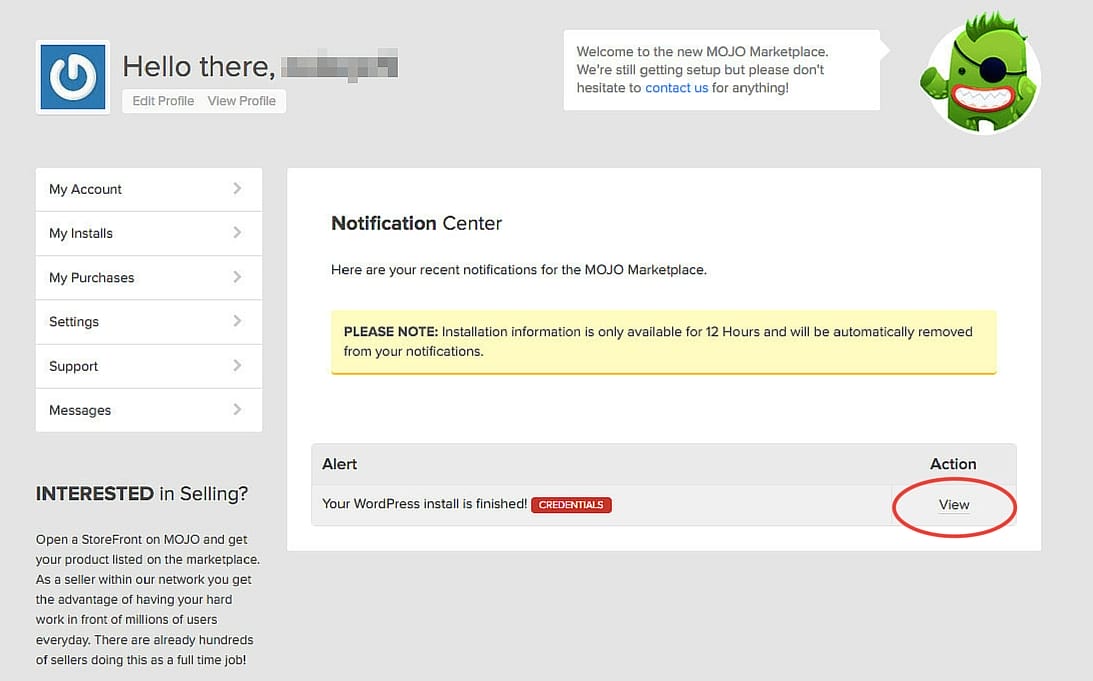
When it’s done, you’ll see the following. Click “View Credentials”.

16. You’ll be taken into your Notification Center. When here, click “View” under the “Action” column.
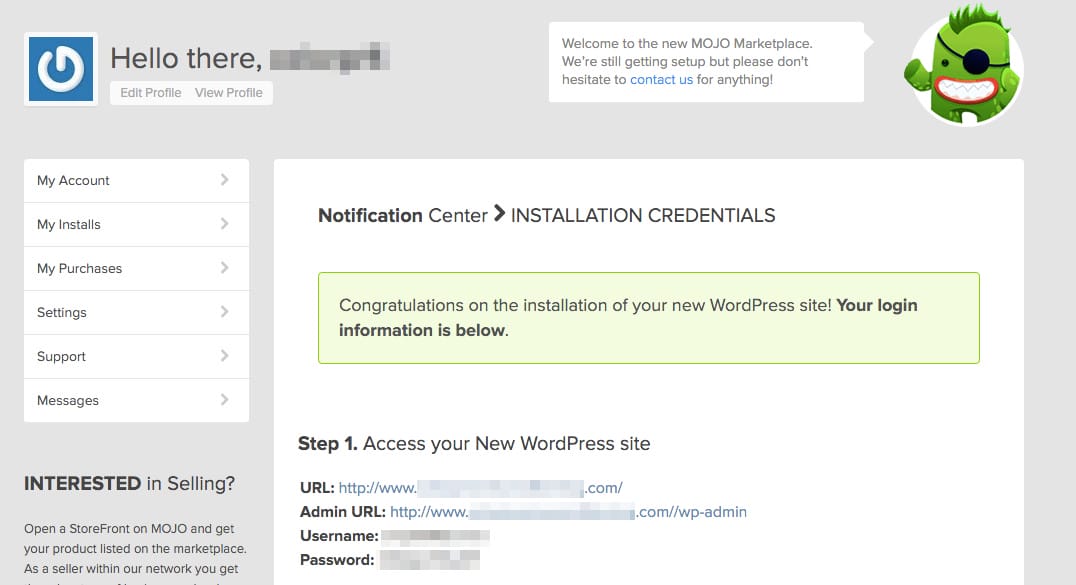
17. After clicking View, you’ll see a few things that should be noted. The Admin URL is where you will log in with the username and password (which are located just below) to administer your WordPress site.
This is where you publish blog posts, upload media, add users, etc. All the good stuff is done here, so get familiar with the URL (which is your site’s url with a /wp-admin tacked on) as well as the username and password.
The other info on that page is basically trying to sell you a theme for your site. A theme is a layout or look-and-feel for your site. You basically install it with just a few clicks, and your website is ready to use pre-delivered posts, pages, etc. This is a great way to get a good looking website set up quickly.
That’s how to start a blog
Ok! That’s it. Great job, you’ve gotten your domain name, your hosting, and WordPress installed. You are now ready to log in and have at it.
Open up a new web browser window and put in the Admin URL to your site. Log in with the super cool admin account you created a few steps ago.
Welcome to the wonderful world of WordPress! Take some time and explore wp-admin. Try adding a post. Play around and have fun.
My intention is to offer more on website development in the near future. Nothing crazy, just the basics like how to create a blog post, how to create a homepage, etc. The bare essentials to get content out to your site.
Sign up for our mailing list and you’ll be the first to know when the next parts are available.
So, have a glass of wine and celebrate your accomplishment. You are on the World Wide Web!!
Thanks for following along on how to start a blog. Let me know in the comments below if you had any problems while following along or if I have anything messed up along the way.
I have a bit of a sense of humor, and when others don’t find me funny, I always do.I don’t take myself too seriously and I love my family.That’s why we’re doing this 🙂
- 31 Amazing RV Upgrades You Can’t Live Without - July 9, 2024
- 8 Breathtaking THINGS TO DO Near Yellowstone National Park - May 22, 2024
- Utah National Parks Road Trip: All 5 Parks & More [Map Included] - May 11, 2024
DISCLOSURE: This post may contain affiliate links, meaning I get a commission if you decide to make a purchase through my links, at no cost to you. Please read my disclosure for more info.
Hi Craig, this is great! I wish I had this when I started my own blog. I probably would have chosen a shorter name as I think mine is too long. I set mine up directly through WordPress. I’m curious, what are the benefits of doing it this way through a web hosting service as opposed to setting it up directly in WordPress?
Hi Heather, thank you! Did you go through wordpress.com? Or did you install wordpress on some other hosting service? We chose bluehost because it was a one-stop-shop for the domain, hosting, and wordpress install for a very reasonable monthly rate.
I started it with WordPress. I didn’t even know you could do it the way you described here.